Dutch Oven & Cast Iron Cooking at Camp: Techniques, Care, and Troubleshooting
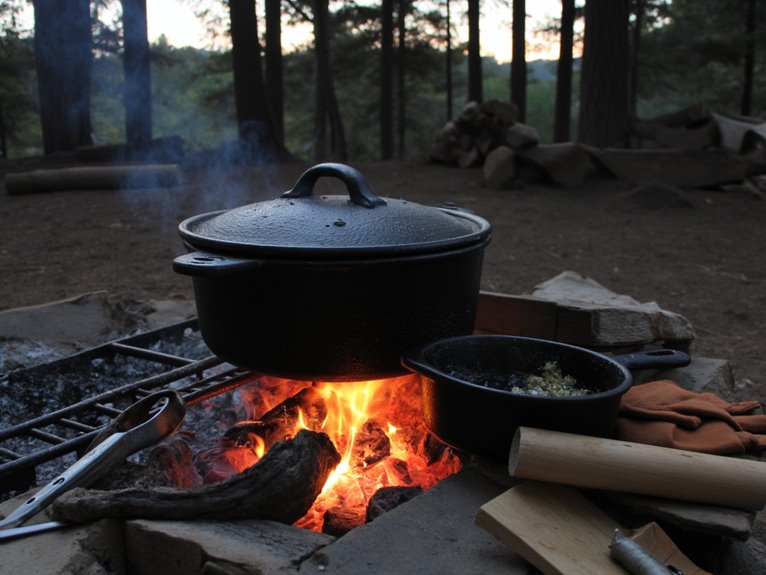
You’ll master Dutch oven and cast iron camp cooking by maintaining 350-400°F with a 3:1 coal ratio, placing more coals on the lid than bottom. Rotate your Dutch oven every 15 minutes to prevent hot spots and monitor temperature every ten minutes. Clean with minimal soap, dry thoroughly, and apply thin oil coats while warm to preserve seasoning. Common issues include uneven heating, food sticking, and rust formation from improper maintenance. Proper setup requires level ground, fire-resistant gloves, and adequate clearance from tents to guarantee safe cooking experiences that’ll expand your outdoor culinary capabilities.
We are supported by our audience. When you purchase through links on our site, we may earn an affiliate commission, at no extra cost for you. Learn more. Last update on 18th December 2025 / Images from Amazon Product Advertising API.
Notable Insights
- Use a 3:1 coal ratio with more coals on the lid than bottom, maintaining 350°F-400°F internal temperatures for even cooking.
- Rotate Dutch oven every 15 minutes and monitor temperature every 10 minutes to prevent hot spots and ensure consistent heat distribution.
- Clean with hot water and minimal soap after use, dry thoroughly, and apply thin oil coats while warm to maintain seasoning.
- Establish secure cooking areas on level ground, 15 feet from tents, with fire extinguisher and burn treatment supplies within reach.
- Remove light rust with steel wool and re-season at 350-400°F for 40 minutes to restore protective coating and prevent future corrosion.
Essential Cooking Techniques for Dutch Ovens and Cast Iron
When you’re cooking with Dutch ovens and cast iron at camp, mastering heat management becomes your most critical skill.
Place charcoal briquettes both underneath and on the lid to create an oven environment. Maintain internal temperatures of 350°F to 400°F for best results.
For effective baking techniques, distribute coals evenly in complete circles above and below. Rotate your Dutch oven one-third turn every 15 minutes to prevent hot spots. Use charcoal briquettes over wood coals—they retain heat longer and require less frequent replenishing.
Braising methods require browning ingredients first, then adding liquids. Cover and simmer with balanced heat distribution from coals positioned on top and bottom.
This technique guarantees even cooking throughout your dish while maintaining consistent moisture levels. Build wind shelters around your cooking area to maintain stable temperatures when air movement threatens heat retention. For beginners, start with stews and soups as these prevent burning and are more forgiving during the learning process.
Proper Care and Maintenance Practices
Mastering Dutch oven and cast iron cooking techniques means nothing if you can’t maintain your equipment properly. Your cookware requires immediate attention after each use. Clean with hot water and minimal soap, then dry thoroughly to prevent rust formation.
Apply thin oil coats while warm to maintain protective seasoning layers.
Seasoning techniques involve heating oiled cookware at 350-400°F for 40 minutes, polymerizing oil into durable non-stick surfaces.
Repeat this process multiple times for ideal results.
Rust restoration requires warming affected areas to 350°F before wire brushing. Remove all corrosion, then rebuild seasoning layers through repeated oil applications and heat treatment.
Store cookware in dry environments with light oil coats and lids slightly ajar for airflow.
Heat Management and Coal Placement Strategies
Although proper cookware maintenance forms the foundation of successful Dutch oven cooking, heat management determines whether your meals turn out perfectly cooked or disappointingly burned. You’ll need to master coal layering techniques for ideal heat retention and distribution.
Use a 3:1 ratio with three times more coals on the lid than underneath. Place coals evenly around the base for uniform bottom heat. Larger coals work best on top to minimize ash contamination.
| Heat Adjustment | Bottom Coals | Top Coals |
|---|---|---|
| Low (325°F) | 8 briquettes | 12 briquettes |
| Medium (350°F) | 10 briquettes | 14 briquettes |
| High (400°F) | 12 briquettes | 16 briquettes |
Monitor temperature every ten minutes. Rotate your Dutch oven periodically to prevent hot spots. Add coals as needed to maintain consistent cooking temperature throughout your meal preparation.
Popular Recipes and Meal Ideas for Camp Cooking
Dutch oven cooking transforms basic camp ingredients into restaurant-quality meals that’ll satisfy hungry campers after long days outdoors.
Main courses like Chicken Cacciatore combine thighs, mushrooms, and tomato-wine sauce for tender results. Jambalaya delivers crowd-pleasing portions using shrimp, sausage, chicken, and rice cooked together efficiently.
One-pot vegetarian options include Pesto Tortellini Bake and pasta dishes featuring olives, sundried tomatoes, and layered cheeses. These campfire meals require minimal cleanup while maximizing flavor development.
Simple meat combinations work reliably for outdoor cooking. Dutch Oven Roast Beef pairs with potatoes and vegetables over coals. Kettle Beef produces tender results with homemade gravy.
Breakfast options include versatile Egg Bake casseroles and sweet Monkey Bread.
Desserts like Apple Pie and Berry Cobbler finish meals perfectly, utilizing residual heat efficiently.
Common Issues and How to Fix Them
Even experienced camp cooks encounter three primary challenges that can turn a promising meal into a frustrating experience.
You’ll face uneven heat distribution that creates hot spots and cold zones, food sticking problems that ruin both your meal and your cookware’s surface, and rust formation that can permanently damage your investment.
Understanding these issues and their solutions guarantees consistent cooking results and extends your Dutch oven’s lifespan for years of reliable camp cooking.
Uneven Heat Distribution
When you’re cooking with cast iron at camp, uneven heat distribution stands as one of the most common frustrations you’ll encounter. Cast iron’s poor heat conductivity creates hot spots where flames directly contact the pan bottom. Your campfire’s irregular flame patterns worsen this problem compared to controlled stovetop burners.
Cast iron’s thermal properties work both for and against you. The metal’s high thermal mass stores substantial heat once warmed, but its slow conduction means heat spreads gradually from contact points. This creates temperature gradients across the cooking surface initially.
Achieve better heat control through proper technique. Preheat your Dutch oven slowly, rotating it periodically over coals. Test for hot spots using butter – it’ll melt faster in overheated areas.
Move your cookware to different coal positions during cooking to compensate for uneven heating patterns.
Food Sticking Problems
Although cast iron develops naturally non-stick properties when properly seasoned, food sticking remains a persistent challenge that’ll test your patience at camp. Sticky surfaces typically result from excessive oil buildup during improper seasoning techniques.
You’re applying too much oil when seasoning, creating gummy residues instead of smooth polymerized layers.
Inadequate preheating causes uneven heat distribution, leaving cold spots where food adheres. Your pan needs consistent medium-high temperatures before adding ingredients. Use cooking oils with high smoke points—avocado or grapeseed oil work best for camp conditions.
When food sticks, you’ve likely used insufficient fat or excessive heat. Let proteins develop natural crusts before flipping. If sticky buildup occurs, strip the seasoning completely and restart the process using thin oil applications at 450°F for proper polymerization. Like ankle holsters that require proper fit and retention for security, cast iron demands the right balance of oil and heat for optimal performance.
Just like maintaining your camp cookware, proper care of your other gear requires consistent attention—whether you’re dealing with dual motorized deadbolts on secure storage or seasoning layers on cast iron surfaces.
Rust Prevention Methods
Rust develops when moisture and oxygen contact unprotected cast iron surfaces, making prevention your primary defense against cookware deterioration. Regular seasoning creates a polymerized coating that seals metal pores.
Apply thin oil layers and bake at 375°F for one hour to establish this protective barrier.
Clean immediately after use with hot water and stiff brushes. Avoid prolonged soaking, which accelerates corrosion.
Dry thoroughly using towels, then briefly heat on low temperature to eliminate residual moisture.
Store in well-ventilated areas with paper towels between stacked pieces.
Apply protective oils like vegetable oil or shortening after each cleaning. This creates a moisture barrier preventing oxygen contact.
Light surface rust requires rust removal using steel wool, followed by complete re-seasoning to restore protection.
Safety Guidelines and Setup Best Practices
When you’re cooking with Dutch ovens at camp, proper safety measures and setup techniques prevent accidents and guarantee consistent results.
You’ll need to establish a secure cooking area with level ground, maintain essential safety equipment within reach, and implement fire prevention protocols before lighting your first coal.
These three foundational elements work together to create a controlled cooking environment that protects both you and your campsite from potential hazards.
Safe Cooking Area Setup
Before lighting your first campfire or firing up a camp stove, you’ll need to establish a cooking area that prioritizes safety above convenience.
Select a flat, stable location downwind from sleeping tents to prevent food odors from compromising wildlife safety. Position your setup away from low-hanging branches and flammable materials.
Essential setup requirements include:
- Surface preparation – Use picnic tables, foldable plastic tables, or flat rocks as stable cooking platforms
- Zone organization – Create designated areas for cooking, food preparation, and cleaning with adequate spacing
- Safety equipment placement – Keep fire extinguishers or water sources within immediate reach
Maintain clear perimeters around your cooking area, removing dry debris that could ignite.
Store fuel sources at safe distances from direct heat to prevent accidental ignition.
Essential Safety Equipment
Proper safety equipment forms the backbone of successful camp cooking and can mean the difference between a memorable outdoor meal and a dangerous emergency. Your safety gear collection must include fire suppression tools, protective equipment, and emergency supplies specifically designed for outdoor cooking environments.
Essential emergency preparedness begins with a multi-class fire extinguisher rated for A, B, and C fires positioned within arm’s reach of your cooking station. You’ll need fire-resistant gloves for handling hot cast iron and a thorough first aid kit stocked with burn treatment supplies.
| Fire Safety | Personal Protection |
|---|---|
| ABC-rated fire extinguisher | Fire-resistant gloves |
| Water bucket with sand/soil | First aid kit with burn supplies |
| Shovel and rake for debris | Heat-resistant cooking mats |
These tools provide immediate response capabilities for common camping cooking hazards and equipment failures. Just as outdoor footwear requires arch support for extended wear during hiking and camping activities, your safety equipment must provide reliable protection throughout your cooking session.
Fire Prevention Measures
Although your safety equipment provides essential emergency response capabilities, preventing fires from starting or spreading requires meticulous attention to site preparation and environmental conditions.
Fire safety begins with proper location selection and clearance protocols.
Essential outdoor precautions include these critical steps:
- Site Preparation: Clear a minimum three-meter radius around your fire pit, removing all combustible debris, dead branches, and leaves that could ignite from stray sparks.
- Distance Requirements: Position your fire at least 15 feet from tents, vehicles, and cooking areas to prevent heat damage and fire spread.
- Environmental Assessment: Avoid lighting fires during windy conditions or drought periods when fire restrictions may be active.
Use existing fire rings when available, or construct proper containment with rocks.
Choose flat, open areas with adequate overhead clearance—maintain at least triple your fire’s height in vertical space above.
Frequently Asked Questions
What Size Dutch Oven Is Best for Different Group Sizes?
For capacity considerations in group cooking, you’ll want an 8-inch for 1-2 people, 12-inch for families of four, 12-inch deep for 6-10 people, and 16-inch for larger gatherings exceeding ten campers.
Can I Use a Dutch Oven on a Camp Stove Instead of Coals?
Yes, you can use a Dutch oven on a camp stove with proper cooking techniques. Use lower heat, preheat gradually, and consider a heat diffuser for even temperature distribution to prevent hot spots.
What’s the Difference Between Enameled and Raw Cast Iron Dutch Ovens?
Raw cast iron requires seasoning and maintenance but handles high heat, while enameled has a glass coating that’s easier to clean but chips easily. Both differences explained affect your camping cooking techniques.
How Long Does It Take to Properly Season a New Dutch Oven?
You’ll need about 4.5 hours total for the complete seasoning process. Apply thin oil layers, bake at the ideal temperature of 450°F for one hour, then repeat three cycles for proper protection.
On a final note
You’ve now mastered the fundamentals of cast iron camp cooking. Your Dutch oven will deliver consistent results when you maintain proper seasoning, manage heat distribution effectively, and follow established coal placement ratios. Remember that cast iron retains heat 30% longer than aluminum cookware. Practice these techniques at home before heading to camp. With proper care, your cast iron will last decades and improve with each use. Cook confidently outdoors.