Treating Common Backcountry Injuries: Sprains, Cuts, Burns, and Blisters
For backcountry sprains, check circulation and sensation distal to injury while looking for localized swelling without deformity. Clean cuts with sterile irrigation and direct pressure, avoiding soap inside wounds. Cool burns immediately with 2-15°C water for twenty minutes minimum-never use ice. Prevent blisters with properly fitted boots, moisture-wicking socks, and paper tape on friction points. Document all findings and monitor for evacuation criteria like persistent respiratory distress or inability to bear weight. Thorough protocols ahead guarantee ideal outcomes.
We are supported by our audience. When you purchase through links on our site, we may earn an affiliate commission, at no extra cost for you. Learn more. Last update on 28th January 2026 / Images from Amazon Product Advertising API.
Notable Insights
- Check circulation, sensation, and motion below sprains while looking for localized swelling and pain without visible deformity.
- Control bleeding with direct pressure, clean wounds with irrigation and sterile gauze, avoiding soap contact inside the wound.
- Cool burns immediately with running water (2°C-15°C) for 20 minutes minimum, never use ice on burn injuries.
- Prevent blisters with properly fitted boots, moisture-wicking socks, and paper tape on friction-prone areas before hotspots develop.
- Evacuate immediately for respiratory distress, altered mental status, inability to bear weight, or chest pain with breathing difficulty.
Sprain Treatment and Assessment in Remote Areas
When you’re miles from the nearest hospital, properly evaluating a sprain can mean the difference between a manageable injury and a medical emergency.
Begin your sprain assessment by checking circulation, sensation, and motion distal to the injury site. Look for key indicators: localized pain, swelling, bruising, and reduced joint mobility. These signs distinguish ligament injury from potential fractures.
Check circulation, sensation, and movement below the injury to identify key signs that separate sprains from fractures.
Check pulse points below the injury. Test sensation by lightly touching fingers or toes. Assess active range of motion within pain tolerance.
Absence of visible deformity combined with localized swelling typically indicates sprain rather than fracture. However, severe pain preventing weight-bearing or numbness suggests complications requiring immediate evacuation.
Document your findings and monitor changes over time to guide treatment decisions. Apply cold immediately to reduce swelling and begin compression with elastic bandages if available. After initial assessment, implement the R.I.C.E. method which includes rest, ice, compression, and elevation to stabilize the injury until medical help becomes available.
Proper Wound Care for Cuts and Lacerations
When you encounter cuts and lacerations in the backcountry, your immediate priority is conducting a systematic wound assessment to determine the injury’s depth, length, and severity before beginning any treatment.
You’ll need to control bleeding through direct pressure while simultaneously evaluating whether the wound requires field closure or evacuation to medical facilities.
Proper cleaning with irrigation solutions, followed by appropriate bandaging techniques, creates the foundation for successful healing and prevents dangerous infections that can compromise your entire expedition.
Initial Wound Assessment Steps
How do you properly assess a wound in the backcountry where medical help isn’t readily available? Start with scene safety and use PPE before approaching. Check the wound’s size, depth, and edge characteristics. Clean wounds show straight edges, while lacerations appear jagged or torn.
| Assessment Factor | Observation Method | Action Required |
|---|---|---|
| Bleeding Type | Color and flow pattern | Direct pressure application |
| Wound Depth | Visual inspection | Determine closure needs |
| Foreign Objects | Careful examination | Avoid removal in field |
| Edge Alignment | Wound margin evaluation | Plan treatment approach |
| Tissue Damage | Gentle palpation | Consider evacuation needs |
Wound cleanliness assessment involves checking for debris and contamination. Apply first aid techniques systematically: control bleeding first, then clean and dress appropriately. Document findings for potential medical handoff.
Cleaning and Disinfection Methods
Once you’ve completed your wound assessment, proper cleaning becomes your immediate priority to prevent infection and promote healing.
Start with water purification using boiling, chemical treatments like Aquamira drops, or UV devices. Boiling remains most reliable for eliminating microorganisms.
For wound irrigation, use at least 500ml of disinfected water delivered through a 35cc syringe without needle to create adequate pressure. Clean around the wound with sterile gauze and mild soap, avoiding soap contact inside the wound itself.
Remove large debris with sterilized tweezers. For contaminated wounds, irrigate with 1% povidone-iodine solution, then rinse thoroughly with disinfected water to prevent tissue damage.
- Your thorough irrigation could mean the difference between healing and dangerous infection
- Every piece of debris you remove reduces your risk of complications miles from help
- Proper water purification protects you from introducing new pathogens into vulnerable tissue
- Using adequate pressure during irrigation physically forces out bacteria that chemicals alone can’t eliminate
- Taking time to clean properly now prevents potentially life-threatening infections later
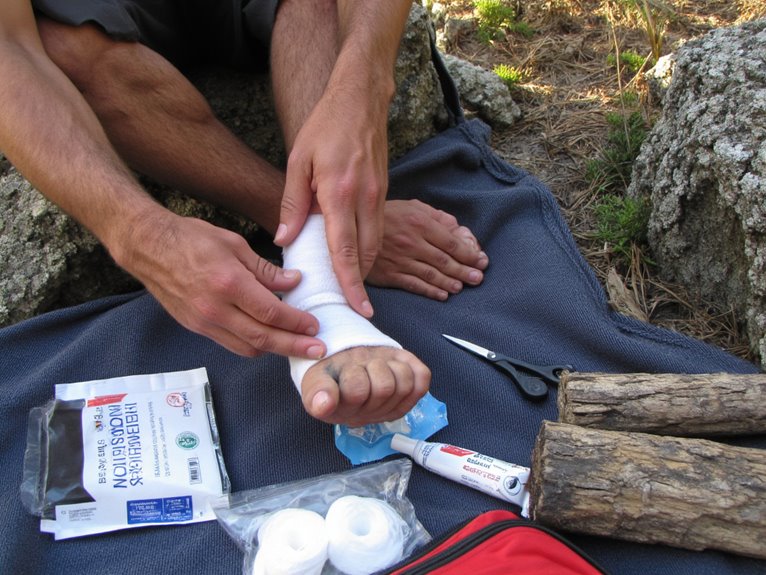
Bandaging and Protection Techniques
After cleaning your wound thoroughly, you’ll need to apply proper bandaging that protects the injury while promoting ideal healing conditions. Effective bandage selection depends on wound size, location, and severity. Start with sterile gauze pads for initial coverage, then secure with medical tape or elastic wrap.
| Bandage Type | Best Use | Key Feature |
|---|---|---|
| Sterile Gauze Pads | Absorbing exudate | High absorbency |
| Non-adhering Dressings | Preventing tissue damage | Easy removal |
| Transparent Films | Monitoring wounds | Moisture retention |
Your dressing techniques should maintain moisture while preventing contamination. Apply a thin layer of antibiotic ointment before bandaging. Secure dressings snugly without restricting circulation. Change bandages every 12 hours or when saturated to prevent bacterial growth and promote ideal healing.
Burn Management and Cooling Techniques
When you’re dealing with burns in the backcountry, your immediate response determines the severity of tissue damage and long-term healing outcomes.
You’ll need to implement a systematic cooling protocol within three hours of injury, followed by proper protective dressing techniques that prevent infection while maintaining ideal wound conditions.
These two critical interventions can mean the difference between a minor setback and a medical evacuation situation.
Immediate Cooling Protocol
Although burns are among the most painful backcountry injuries, immediate cooling with the right technique can markedly reduce tissue damage and improve healing outcomes.
Start cooling within seconds of injury using cool running water between 2°C and 15°C. Continue for 20 minutes minimum-studies show this duration significantly reduces burn severity and prevents deeper tissue damage.
Remove clothing quickly to eliminate heat retention. Use potable water when possible to minimize infection risk. If running water isn’t available, refresh wet cloths every 3 minutes, though this method is less effective.
Critical Protocol Steps:
- Never use ice – it causes additional tissue damage and hypothermia
- Remove jewelry immediately before swelling begins
- Cool for 20 minutes minimum – insufficient cooling increases complications
- Start within 3 hours – effectiveness decreases after this window
- Maintain consistent temperature – running water works better than immersion
Protective Dressing Application
Once the 20-minute cooling period ends, you’ll need to apply protective dressing within minutes to prevent contamination and support healing.
First, cleanse the wound with soap and water to reduce bacterial load. Remove loose skin and debride blisters larger than 6mm. Shave surrounding hair to minimize bacterial colonization.
When standard supplies aren’t available, alternative dressings prove effective. Boiled potato peels create protective barriers, while banana leaves offer waxy, contamination-resistant coverage. Aloe vera provides excellent wound hydration and pain relief. Honey and sugar paste deliver antimicrobial properties under austere conditions.
Cover burns immediately to prevent environmental contamination from bacteria, spores, and mold. Maintain moisture levels to support tissue repair.
Change dressings regularly while minimizing exposure time to prevent hypothermia and desiccation.
Blister Prevention and Treatment Methods
Friction remains the primary culprit behind blister formation, creating painful separations between skin layers through repetitive shear forces against footwear.
Repetitive shear forces from ill-fitting footwear cause painful skin layer separation, making friction the leading cause of blister development.
Heat and moisture compound this problem by softening skin tissue. Effective blister prevention requires properly fitted boots that minimize foot movement inside the shoe.
Wear moisture-wicking synthetic socks rather than cotton varieties that retain dampness.
For high-risk areas, apply paper tape to known blister-prone spots before activity begins. Studies show 40% reduction rates when applied preventively. Double-layer sock systems create independent movement zones that reduce friction transfer to skin.
Essential blister treatment and prevention strategies:
- Monitor feet for red, tender “hotspots” before blisters develop
- Change socks regularly during extended activities to control moisture
- Apply moleskin padding over existing hotspots immediately
- Avoid draining intact blisters unless absolutely necessary
- Maintain strict foot hygiene to prevent secondary infections
Essential First Aid Kit Components and Safety Protocols
When medical emergencies strike in remote wilderness areas, your survival often depends on having the right supplies and knowing how to use them effectively. Proper first aid kit organization guarantees rapid access to critical components during high-stress situations.
| Category | Essential Items |
|---|---|
| Wound Care | Antiseptic wipes, sterile gauze pads (2″x2″, 3″x3″), hemostatic agents |
| Medications | Ibuprofen, antihistamines, hydrocortisone 1% cream |
| Tools | Medical scissors, nitrile gloves, CPR microshield mask |
| Emergency | SAM splints, elastic bandages, emergency bivy |
Store supplies in waterproof compartments with clear labeling. Include benzalkonium chloride-based antiseptic wipes and pressure dressings for bleeding control. Pack oral rehydration salts and anti-diarrheal medications for gastrointestinal emergencies. Quality hearing protection with proper noise reduction ratings becomes essential when operating emergency signaling devices or power equipment during rescue situations. If your backcountry activities involve power tools or equipment, include quality ear protection with appropriate noise reduction ratings to prevent hearing damage during emergency repairs. Conduct regular inventory checks and maintain proficiency through hands-on training with each component.
Emergency Evacuation Criteria and Decision Making
Although you’ve packed the right supplies and mastered basic first aid techniques, deciding whether to evacuate an injured person from the backcountry represents one of the most critical judgments you’ll face in wilderness medicine.
Evacuation triggers include persistent respiratory distress, altered mental status, loss of consciousness, and inability to bear weight. These red flag symptoms demand immediate action.
Decision factors encompass patient mobility, environmental conditions, available manpower, and evacuation route options.
Consider these critical scenarios requiring evacuation:
- Chest pain with breathing difficulty – potential heart attack
- Vomiting blood – internal bleeding emergency
- Fever with severe diarrhea – dehydration and infection risk
- Signs of shock – pale skin, rapid pulse, confusion
- Psychological emergencies threatening group safety
Your evacuation method depends on injury severity and terrain accessibility. Just as hunters plan their safety equipment purchases around seasonal promotions, backcountry travelers should prepare evacuation strategies well before venturing into remote areas.
Frequently Asked Questions
Can I Use Natural Remedies Like Aloe or Honey for Burns?
Yes, you can use natural burn remedies like aloe vera and honey for minor burns. Aloe vera effectiveness is proven for first- and second-degree burns, reducing healing time considerably compared to conventional treatments.
Should I Pop a Blister or Leave It Intact While Hiking?
Leave it intact. Proper blister care means avoiding popping risks like infection and increased pain. The intact roof protects underlying skin, reduces bacteria exposure, and promotes faster healing while you’re hiking.
On a final note
You’ve now got the essential knowledge to handle common backcountry injuries effectively. Remember, proper assessment prevents complications. Clean wounds immediately with sterile saline. Cool burns for 10-20 minutes using clean water. Drain blisters only if they’re large or painful. Your first aid kit should contain antiseptic, gauze, tape, and pain relievers. Don’t hesitate to evacuate if you’re unsure about severity or treatment effectiveness.