Avalanche Awareness Basics for Backcountry Campers (Non-Technical)
You’ll face avalanche danger on slopes between 30° to 45°, with 38° being the prime sliding angle. Listen for “whumpfing” sounds and watch for shooting cracks underfoot-these indicate unstable snow layers. Carry essential safety gear: avalanche transceiver worn on your body, 240cm+ probe, and metal shovel. Check daily avalanche forecasts and avoid wind-loaded slopes where unstable snowdrifts accumulate. Stay in forested areas or lower-angle terrain when possible. Understanding these fundamentals will prepare you for more advanced backcountry decision-making techniques.
We are supported by our audience. When you purchase through links on our site, we may earn an affiliate commission, at no extra cost for you. Learn more. Last update on 17th January 2026 / Images from Amazon Product Advertising API.
Notable Insights
- Avoid slopes between 30-45 degrees where most avalanches occur, and stay away from gullies and bowls that collect snow.
- Watch for warning signs like shooting cracks underfoot, “whumpfing” sounds, and recent avalanche debris in the area.
- Carry essential safety gear: avalanche transceiver worn on body, metal shovel, and 240cm+ probe for emergency rescue.
- Check daily avalanche forecasts and danger ratings before entering backcountry terrain to plan safer routes.
- Learn basic rescue techniques including transceiver searching, systematic probing, and efficient digging methods for emergency situations.
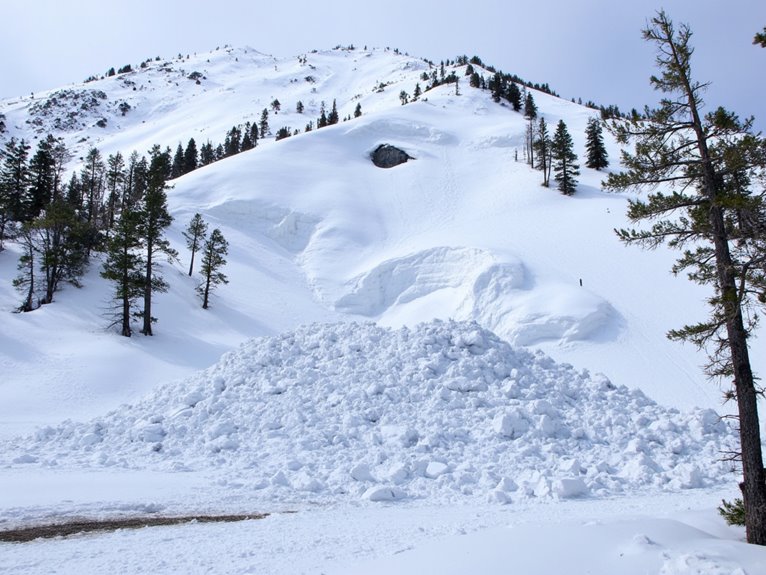
Understanding Where Avalanches Happen
When you’re planning a backcountry camping trip, understanding avalanche-prone terrain can mean the difference between a safe adventure and a life-threatening situation. Slope angles between 30° to 45° present the highest avalanche risk, with 38° being the prime sliding angle.
Knowing which slopes trigger avalanches transforms backcountry camping from a deadly gamble into calculated risk management.
You’ll rarely encounter avalanches on slopes below 30°, but they can occur on gradients as gentle as 25° or as steep as 60°.
Pay attention to specific terrain features that concentrate danger. Gullies, bowls, and concavities accumulate deep snow where cracks propagate easily. Wind-loaded slopes on lee sides of ridges create unstable snowdrifts.
Convex slopes concentrate stress in the snowpack, making them prime trigger zones. Terrain traps like streambeds amplify burial depth, markedly increasing danger levels. Areas with large slopes above you, particularly those exceeding 60 vertical meters, can release massive snow volumes that dramatically increase slide size and destructive power. Avalanche-prone locations can occur on all aspects and altitude zones, so don’t assume any direction is automatically safe.
Reading the Warning Signs in Snow and Weather
Before you enter avalanche terrain, you must learn to read the snowpack’s subtle warning signals that reveal hidden instabilities. Snow stability indicators provide critical information about potential hazards.
Shooting cracks underfoot signal slab instability. Collapsing snow creates “whumpfing” sounds when weak layers fail. Drum-like sounds reveal poor bonding between snow layers.
Weather influence dramatically affects avalanche danger. Significant snowfall adds load to existing layers. Wind transports snow from windward to leeward slopes, creating dense slabs. Rapid warming melts snow, forming wet layers prone to failure.
Visual clues help identify hazards:
- Recent avalanche debris or crown lines confirm snowpack failure
- Surface hoar crystals create potential weak layers
- Rime ice indicates recent moisture and wind activity affecting stability
These warning signs demand immediate terrain reassessment.
Essential Safety Gear Every Backcountry Camper Needs
Survival in avalanche terrain depends entirely on carrying the right equipment and knowing how to use it effectively.
The Big Three forms your core safety gear: avalanche transceiver, probe, and shovel. You must wear your beacon on your body, never store it in your pack. Choose probes longer than 240cm for better reach and efficiency. Metal shovels outperform plastic alternatives for moving heavy snow loads quickly.
Your avalanche safety depends on three non-negotiable items: transceiver worn on body, 240cm+ probe, and reliable metal shovel.
Additional essential tools include avalanche airbag backpacks, which inflate to keep you near the surface during burial. Two-way radios maintain group communication when cell coverage fails. GPS devices and slope meters help you navigate and assess terrain risk.
Pack a compact first aid kit, emergency shelter, and energy bars. Remember: carrying gear means nothing without regular training and practice sessions.
Making Smart Decisions in Avalanche Country
Although proper gear provides your safety foundation, smart decision-making in avalanche terrain separates experienced backcountry travelers from those who rely on luck.
Effective risk management begins with understanding the North American Avalanche Danger Scale, which rates conditions from Low to Extreme. You’ll need to interpret daily avalanche forecasts that specify dangerous slope angles, elevations, and aspects to avoid.
Smart terrain selection involves choosing routes with lower-angle slopes, ridges, or forested areas that provide natural protection.
Always identify escape routes and decision points before entering questionable terrain.
- Measure slopes above 30° and evaluate carefully for avalanche potential
- Avoid terrain traps like gullies and cliffs that funnel debris
- Recognize cognitive biases like familiarity or destination fixation that cloud judgment
Basic Rescue Knowledge That Could Save Lives
Every second counts when someone gets buried in an avalanche, and your rescue skills determine whether they’ll survive the ordeal.
You’ll need three essential tools: an avalanche transceiver, collapsible probe, and lightweight shovel. These rescue techniques follow a systematic approach that maximizes victim recovery efficiency.
Start by ensuring scene safety, then switch transceivers to search mode. Work from the last seen area through signal, coarse, and fine search phases. Once you’ve located the strongest signal, begin systematic probing in 25-centimeter intervals using a spiral pattern. Leave the probe in place when you make contact.
Dig one to two steps downhill from the probe location, creating a downward ramp. Team members should rotate frequently to maintain digging pace.
Uncover the victim’s face first to establish airway access immediately.
Frequently Asked Questions
How Much Does Basic Avalanche Safety Equipment Cost?
You’ll spend $300-600 for basic avalanche gear including beacon, shovel, and probe. The cost breakdown shows transceivers ($300-600), shovels ($60-100), and probes ($65-100), with bundled packages offering slight savings.
Can Avalanches Happen in Areas With Trees or Moderate Slopes?
Yes, trees and avalanches can occur together, especially in sparse forests. Moderate slopes risk remains significant between 25-35 degrees. Dense tree cover reduces but doesn’t eliminate avalanche danger, so you shouldn’t assume complete safety.
On a final note
You’ve learned the fundamentals of avalanche safety for backcountry camping. Apply terrain recognition skills to identify dangerous slopes exceeding 30 degrees. Monitor weather patterns and snowpack conditions daily. Carry your beacon, probe, and shovel on every trip-they’re useless at camp. Practice rescue techniques before you need them. Most importantly, don’t hesitate to turn back when conditions deteriorate. Your judgment and preparation determine whether you’ll return home safely from avalanche country.