Hammock Camping Essentials: Setup, Insulation, and Weatherproofing
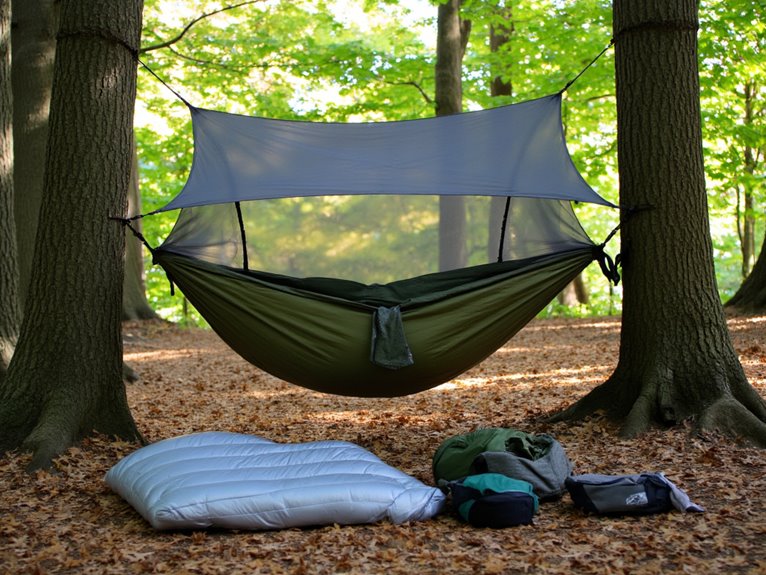
You’ll need three essentials for successful hammock camping: proper suspension setup, effective insulation, and weatherproof protection. Position your hammock at a 30-degree angle between trees spaced 12-20 feet apart, using wide straps to protect bark. Combat heat loss with an underquilt or sleeping pad, as hammocks create significant cold spots underneath. Install a tarp rated 3000-5000mm waterproof with drip lines for rain protection. Master these fundamentals to discover advanced techniques that’ll elevate your outdoor sleeping experience.
We are supported by our audience. When you purchase through links on our site, we may earn an affiliate commission, at no extra cost for you. Learn more. Last update on 18th January 2026 / Images from Amazon Product Advertising API.
Notable Insights
- Select healthy trees 6-8 inches diameter spaced 12-20 feet apart, using wide straps to protect bark and ensure safe suspension.
- Maintain 30-degree suspension angle with hammock 18 inches above ground and anchor points 4-6 feet high for optimal comfort.
- Use underquilts or sleeping pads to prevent heat loss, plus top quilts with 800+ fill power down for temperatures near 20°F.
- Deploy silnylon tarps with 3000-5000mm waterproof rating, ensuring complete coverage and proper tensioning to prevent water pooling.
- Install drip lines using thin cordage loops to divert water runoff and position ridgeline lower during wind-driven rain.
Choosing the Perfect Campsite and Trees
When you’re selecting a campsite for hammock camping, the foundation of your comfort and safety begins with choosing the right trees and location.
Select healthy trees with minimum 6-inch diameters, checking for flexibility and absence of decay or insect damage. Different tree species vary in bark sensitivity, so use wide straps (0.75-2 inches) to distribute pressure evenly.
Space trees 12-15 feet apart for ideal suspension geometry. Closer spacing creates excessive sag; greater distances complicate setup.
Position your campsite at least 200 feet from water sources following Leave No Trace principles. Choose durable surfaces like rock or gravel over fragile vegetation.
Avoid slopes and low-lying areas prone to water pooling. Look for level ground in the surrounding area to set up any additional gear or create comfortable walking areas around your hammock setup.
Consider campsite scenery while prioritizing practical factors: overhead hazards, wildlife signs, and natural drainage patterns affect your safety more than aesthetics. Thoroughly inspect the area for falling branches or widow makers that could pose serious safety risks during your stay.
Mastering Suspension Angles and Height
Once you’ve identified suitable trees and positioned your campsite, the technical precision of your hammock suspension becomes the determining factor between a restful night and an uncomfortable experience. Target a 30-degree angle between your straps and ground for ideal comfort and force distribution. Suspension adjustments should position your hammock’s lowest point 18 inches above ground, requiring anchor points 5-6 feet high on trees.
| Parameter | Specification |
|---|---|
| Suspension Angle | 30 degrees |
| Ground Clearance | 18 inches |
| Anchor Height | 5-6 feet |
| Body Position | 10-15 degrees diagonal |
| Hammock Tension | Moderate sag |
Excessive hammock tension creates exponentially higher forces on anchor points and compromises comfort. Position yourself diagonally across the hammock’s centerline to achieve a flat sleeping surface.
Essential Hardware and Attachment Systems
The foundation of reliable hammock suspension rests entirely on selecting appropriate hardware and attachment systems that can withstand dynamic loads while providing consistent performance across varied conditions. Your hammock attachment system requires components rated for at least 5,000 pounds to guarantee safety margins.
Reliable hammock suspension demands hardware rated for 5,000+ pounds to handle dynamic loads and ensure consistent safety margins.
Modern suspension designs eliminate knots through specialized hardware that reduces setup time while maximizing strength.
Essential hardware components include:
- Carabiners – Aluminum or steel construction with locking mechanisms for secure connections
- Whoopie Slings – Dyneema cordage offering adjustable length without knots
- Tree Straps – Wide nylon webbing (1-2 inches) protecting bark while distributing weight
- Ridgeline Organizers – Hardware supporting bug nets and tarps above your hammock
Choose corrosion-resistant materials with UV protection for extended durability in outdoor environments.
Staying Warm With Proper Insulation Techniques
Proper insulation setup determines whether you’ll sleep comfortably or shiver through the night in your hammock.
You’ll need to address heat loss from below using either an underquilt that wraps beneath your hammock or a sleeping pad placed inside the hammock body.
Layering these insulation methods creates multiple thermal barriers that prevent cold air from robbing your body heat through convection and conduction.
Underquilt and Pad Setup
While your hammock provides the foundation for comfortable sleeping, it’s the underquilt that determines whether you’ll stay warm or shiver through the night. Proper setup requires precise attachment techniques and suspension adjustments to maximize thermal efficiency.
Essential Setup Steps:
- Attach thick straps to hammock ends, securing the underquilt with moderate tension.
- Create minimal air gaps by positioning the underquilt close to your hammock’s underside.
- Fine-tune suspension lines in ½-inch increments after lying down to eliminate cold spots.
- Secure side attachments along edges to prevent drafts and air infiltration.
Down and synthetic insulation materials perform differently under compression. Avoid over-tightening suspension systems, as compressed loft reduces insulating capacity by 60-80%. Just as breathable fabrics help manage moisture in hiking pants, proper underquilt positioning allows air circulation while maintaining thermal efficiency.
Regular underquilt maintenance includes checking attachment points and preserving material integrity for ideal thermal performance. Just as with tactical gear, adjustable retention systems allow for customizable positioning to ensure your insulation remains securely in place throughout the night.
Layering for Heat Retention
Beyond underquilt setup, your ability to stay warm depends on strategic layering that creates multiple thermal barriers between your body and the cold air beneath your hammock.
Start with a moisture barrier beneath your hammock using thin foam pads to prevent ground dampness from compromising your insulation materials. Layer from interior outward: moisture barrier, insulation pad, then weatherproof shell.
Synthetic insulation materials like Climashield maintain warmth when wet and dry quickly. Down offers superior warmth-to-weight ratios but fails when damp. Closed-cell foam provides R-values around 2, while inflatable pads reach 5+.
Your layering techniques should incorporate reflective foil inside layers to redirect body heat. Use multiple insulation types together-combine reflective layers with synthetic quilts.
Encase sleeping bags around the hammock like a cocoon to prevent loft compression and maintain thermal efficiency.
Weatherproofing Your Hammock Setup
When rain threatens your hammock camping adventure, effective weatherproofing becomes the difference between a comfortable night’s sleep and a miserable soaking experience.
You’ll need strategic tarp configurations and proper wind protection to create a secure shelter system.
Essential weatherproofing components include:
- Silnylon or polyurethane-coated tarps sized for complete coverage over your hammock and gear
- Drip lines using thin cordage in 15-20cm loops between suspension points to divert water runoff
- Proper tarp tensioning with firmly staked perimeters to prevent water pooling and wind penetration
- Ridgeline adjustments positioned lower during wind-driven rain to minimize edge infiltration
Install your ridgeline above the hammock using cords longer than your suspension system.
Wrap tarp configurations completely around your setup to block wind effectively while maintaining breathable ventilation points.
For optimal rain protection, choose tarps with waterproof ratings between 3000-5000mm and sealed seams similar to high-quality trekking tents.
Safety Protocols and Site Preparation
Proper site selection and safety protocols form the foundation of successful hammock camping, as poor choices can lead to equipment failure, personal injury, or environmental damage. Your tree selection requires trunks with minimum 8-inch diameters spaced 15-20 feet apart. Maintain 30-degree suspension angles and keep hammocks under 18 inches high while guaranteeing 1-2 feet ground clearance.
| Safety Element | Specification | Critical Points |
|---|---|---|
| Tree Diameter | Minimum 8 inches | Guarantees load-bearing capacity |
| Suspension Height | Maximum 18 inches | Reduces fall injury risk |
| Ground Clearance | 1-2 feet minimum | Prevents ground contact |
| Suspension Angle | 30 degrees ideal | Balances comfort and safety |
Hammock safety demands avoiding site hazards including sharp rocks, water features, and deadwood overhead. Inspect all equipment before use and perform gentle weight tests after setup.
Best Practices for Long-Term Comfort
You’ll need to master three critical elements to maintain comfort during extended hammock camping trips.
Proper sleep positioning prevents the banana curve that causes back pain and circulation issues, while effective temperature regulation systems keep you warm without overheating throughout changing nighttime conditions.
Extended stay preparations involve optimizing your gear setup and developing maintenance routines that guarantee consistent comfort over multiple nights in the backcountry.
Proper Sleep Positioning
Although many campers instinctively lie straight along their hammock’s length, the key to comfortable overnight rest lies in adopting a diagonal positioning that transforms the curved fabric into a flatter, more supportive surface.
This technique eliminates the uncomfortable “banana” shape that creates shoulder squeeze and calf pressure. Position yourself at approximately 30 degrees to the hammock’s centerline for ideal pressure relief.
Essential diagonal sleep positioning techniques:
- Angle placement – Lie at 30 degrees to the centerline
- Foot elevation – Hang foot end 8-10 inches higher than head
- Knee positioning – Allow natural bending for zero-gravity posture
- Weight distribution – Spread body weight evenly across fabric
This positioning prevents hyperextension while enabling multiple sleep positions including back, side, and fetal arrangements.
You’ll experience reduced tossing and improved circulation throughout the night.
Temperature Regulation Systems
When temperatures drop below 60°F, your body loses heat through four distinct mechanisms that can turn a comfortable hammock sleep into a miserable experience.
Conductive heat loss occurs when your body transfers warmth directly to cold surfaces beneath you. Underquilts create essential air barriers, preventing this direct heat transfer while accommodating temperature variations throughout the night.
Top quilts with 800+ fill power down provide superior heat retention above your torso. Heavy 2.5-inch thick quilts maintain comfort ratings near 20°F.
Reflective materials placed below your hammock reduce radiative heat loss by bouncing warmth back toward your body.
Moisture management prevents evaporative cooling. Wear moisture-wicking base layers and avoid overdressing to prevent sweat accumulation. Quality materials with sweat-proof protection ensure your insulation system maintains effectiveness even in humid conditions.
Wind protection through properly positioned tarps eliminates convective heat loss.
Just as barefoot shoes feature zero-drop soles and wide toe boxes for natural foot positioning and comfort, your hammock sleep system requires proper body alignment and temperature regulation to maintain natural rest patterns throughout the night.
Extended Stay Preparations
Multi-night hammock camping demands strategic preparation beyond basic overnight comfort. Extended stays require systematic gear organization and maintenance routines that prevent equipment failure and maximize efficiency.
Proper site selection becomes critical for long-term comfort. Research tree spacing between 12-15 feet with 6-inch minimum diameter trunks. Position your setup 200+ feet from water sources to avoid flood risks. Mount suspension straps at 4-5 feet height with 30-degree angles, keeping the hammock’s lowest point 18 inches above ground.
Essential extended stay protocols include:
- Install ridgelines with organizers and storage pockets for accessible gear management.
- Deploy quality tarps with adjustable guy lines and proper pitch angles.
- Implement daily inspection routines for suspension systems and weather protection.
- Use multiple waterproof stuff sacks for organized equipment storage.
Regular maintenance prevents costly gear failures during multi-day adventures.
Frequently Asked Questions
Can I Hammock Camp in Winter or Below-Freezing Temperatures?
Yes, you can hammock camp in winter or below-freezing temperatures with proper winter insulation like underquilts and sleeping pads. Cold weather hammock camping requires gradual preparation and essential gear.
How Do I Pack and Maintain My Hammock Gear Properly?
Use compression sacks and dry bags for hammock gear storage. Follow maintenance tips: air-dry everything completely, inspect hardware regularly, clean suspension straps, store loosely in cool places, and organize small items in labeled pouches.
What’s the Weight Limit for Most Camping Hammocks?
Most camping hammocks support 250-400 pounds, though you’ll find double hammocks handle 400-500 pounds. Your hammock material types and hammock suspension systems directly affect capacity-ripstop nylon and reinforced hardware increase limits considerably.
Are There Legal Restrictions on Hammock Camping in National Parks?
Yes, you’ll encounter hammock regulations in national parks. Park policies vary considerably – some require permits, designated areas, or hammock stands to protect trees, while others prohibit hammock camping entirely in certain zones.
On a final note
You’ve now mastered the core elements of successful hammock camping. Proper tree selection, correct suspension angles, and quality hardware form your foundation. Effective insulation systems prevent heat loss from below. Weatherproofing keeps you dry in adverse conditions. Following safety protocols protects both you and the environment. These techniques guarantee comfortable nights outdoors. Practice these skills in controlled conditions before attempting challenging expeditions. Your hammock setup will become second nature with experience.