How to Properly Fit Backpacking Shoes to Avoid Blisters and Injuries
When fitting backpacking shoes, you’ll need to measure both feet wearing actual hiking socks and size for your larger foot. Leave one thumb’s width (0.5 inches) between your longest toe and boot front to prevent downhill injuries. Check heel security through lift tests-excessive movement causes blisters. Make certain of adequate width to prevent lateral sliding while allowing natural toe splay. Fit boots in late afternoon when feet are naturally swollen, and master various lacing techniques to optimize comfort and performance throughout your adventures.
We are supported by our audience. When you purchase through links on our site, we may earn an affiliate commission, at no extra cost for you. Learn more. Last update on 27th January 2026 / Images from Amazon Product Advertising API.
Notable Insights
- Always fit shoes to your larger foot and size up half a size to accommodate natural foot swelling during long hikes.
- Ensure 0.5 to 0.75 inches of space between your longest toe and shoe front to prevent toe injuries on descents.
- Test heel fit by performing heel lift checks – minimal heel movement prevents blisters and maintains ankle stability.
- Choose boots with adequate width and flexible toe boxes to allow natural toe splay and prevent lateral compression injuries.
- Fit shoes in late afternoon when feet are naturally swollen and wear actual hiking socks for accurate sizing.
Understanding Your Foot Shape and Size Asymmetries
Why do even the most expensive backpacking shoes feel uncomfortable after just a few miles on the trail? The answer lies in understanding your unique foot shape and size asymmetries. Your feet exhibit distinct characteristics including arch type, length, width, and volume that directly impact fit quality.
Most people have slight length differences between feet that can exceed half a shoe size. You should always fit shoes based on your larger foot to prevent toe impact and blisters.
Always fit hiking boots to your larger foot since most people have length differences exceeding half a shoe size between feet.
Width and volume asymmetries also affect snugness throughout the shoe. Your foot shape includes multiple variables: arch height ranges from flat to high, toe boxes vary from narrow to fan-shaped, and midfoot-to-heel proportions differ considerably between individuals. Boots with wide toe boxes allow your toes to splay naturally and can prevent deformities while improving overall comfort.
Not accounting for these variations increases injury risk substantially. Hikers with flat feet require shoes with stiff heel counters to ensure proper heel lock and prevent instability during terrain changes. Many experienced hikers recommend ordering a half-size up to accommodate foot swelling during long hikes and allow space for thicker socks. Quality materials like ripstop nylon and double-stitched seams enhance the durability and longevity of backpacking shoes.
Measuring Length With Proper Hiking Socks and Spacing
You’ll need to wear your actual hiking socks during every measurement and fitting session, as sock thickness directly affects internal boot volume and overall fit accuracy.
Start by measuring both feet separately using the paper-and-pencil method or a Brannock device, then use the longer foot’s measurement for sizing since most people have slight asymmetries between left and right feet.
After selecting a boot size, verify proper length by checking for approximately one thumb’s width of space (roughly half an inch) between your longest toe and the boot’s front when standing with your hiking socks on.
Wear Intended Hiking Socks
Getting the right fit starts with wearing your actual hiking socks during the shoe fitting process. You can’t achieve proper spacing using thin cotton socks, then expect the same fit with thick hiking socks on the trail.
Sock material selection directly impacts internal shoe volume. Merino wool and synthetic fibers create different thickness profiles than cotton alternatives. Technical hiking socks add 2-4mm of material around your foot, requiring additional shoe space.
Sock cushioning options vary greatly between manufacturers. Light cushioning adds minimal bulk, while maximum cushioning increases internal volume considerably. This affects pressure points and overall fit.
| Sock Type | Thickness (mm) | Volume Impact |
|---|---|---|
| Light Cushion | 2-3 | Minimal |
| Medium Cushion | 3-4 | Moderate |
| Heavy Cushion | 4-6 | Notable |
| Maximum Cushion | 6+ | Maximum |
Measure your feet while wearing intended hiking socks to guarantee accurate sizing and prevent blisters.
Identify Your Longer Foot
Foot asymmetry affects nearly everyone, making bilateral measurement essential for proper boot selection. Most people have one foot that’s 2-5mm longer than the other. You’ll need to measure both feet to identify which is longer since this determines your boot size.
Place your foot on a flat surface with your heel against a wall. Mark the tip of your longest toe on paper, then measure from heel to mark. Repeat this process for both feet while wearing your intended hiking socks. These foot measurement techniques account for sock thickness affecting volume and length requirements.
Always size boots according to your longer foot‘s measurements. Boot fitting essentials demand this approach to prevent excessive tightness. Just as with winter coats, proper fit is crucial for performance and comfort during outdoor activities.
Using a Brannock device provides 96% accuracy for length, width, and arch measurements, ensuring ideal fit.
Pay attention to brand-specific sizing variations, as some models like SHULOOK shoes run about two sizes smaller than standard while others like the Paladin model recommend ordering one size up due to their characteristically small fit.
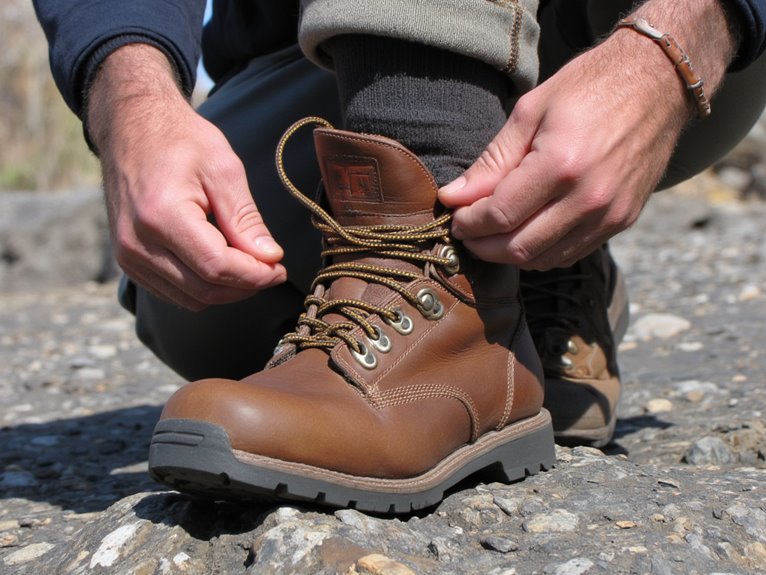
Check Thumb Width Space
Why does proper toe spacing matter so much in backpacking shoes? Your toes constantly slam forward during downhill descents, causing blackened nails and painful blisters without adequate space.
Always wear your intended hiking socks during measurement-they add essential volume that affects fit accuracy.
Place your thumb between your longest toe and the shoe’s front. This thumb measurement tips technique provides 0.5 to 0.75 inches of ideal space. Less distance causes toe impact injuries. More than a full thumb’s width indicates oversized shoes that create heel slippage.
These space guidelines prevent common trail injuries while maintaining proper foot positioning. Push your foot forward in the unlaced shoe, then check the heel-to-back gap. One to two finger widths confirms correct sizing.
This industry-standard method replicates actual hiking conditions and reduces injury risk considerably. Just like hiking coats require adjustable features for proper layering and movement, your footwear must accommodate natural foot expansion during extended trail use. Just as with sleeping gear where a minimum thickness of 3 inches provides optimal comfort and support, proper footwear spacing ensures your body maintains essential protection during extended outdoor activities.
Finding the Right Width and Toe Box Dimensions
You’ll need to balance two critical factors when selecting width and toe box dimensions: preventing toe compression while maintaining heel security.
Proper width guarantees your foot doesn’t slide laterally inside the boot, which causes blisters and reduces stability on uneven terrain.
The toe box must provide adequate room for natural toe movement without allowing so much space that your heel lifts excessively during each step.
Avoiding Toe Compression Issues
When shopping for backpacking shoes, proper toe box dimensions often make the difference between comfortable miles and painful injuries. You’ll need adequate width and depth to prevent compression that causes black toenails, blisters, and hotspots.
| Toe Box Feature | Insufficient Space | Adequate Space |
|---|---|---|
| Width | Compressed toes, interdigital corns | Natural toe splay, reduced friction |
| Depth | Black toenails, vertical pressure | Clearance for toe movement |
| Length | Impact injuries on descents | 10mm+ buffer from longest toe |
| Flexibility | Rigid pressure points | Toe box flexibility adapts to foot |
Look for shoes with toe box flexibility that accommodates natural toe splay. Mesh uppers provide more give than leather constructions. Zero-drop designs often feature deeper toe boxes that maintain natural toe positioning throughout your hike. Some hikers report walking over 30 miles pain-free when selecting shoes with maximal toe freedom that allow natural foot movement during extended distances.
Heel Width Security
While toe box dimensions prevent compression injuries, heel width security forms the foundation of proper backpacking shoe fit by eliminating the foot movement that causes blisters and stability issues on challenging terrain.
Your heel requires firm containment within the shoe’s heel counter without compression that restricts blood flow.
Test heel security using these critical assessments:
- Heel lift test – Walk on your toes while fully laced; any noticeable heel movement indicates improper fit
- Side-to-side movement – Check for lateral heel sliding that compromises ankle stability
- Pressure point evaluation – Verify the heel counter doesn’t create uncomfortable pressure spots
A properly fitted heel counter locks your foot securely while heel padding provides comfort during extended hiking.
If slippage persists, consider heel grips or narrower width sizing to achieve excellent security. Many hiking shoes feature cushioned insoles that provide immediate comfort and eliminate the need for extensive break-in periods.
Just as with winter pants where sizing considerations require careful attention to size charts and body proportions, backpacking shoes demand precise fitting to prevent discomfort and maintain functionality during outdoor activities.
Aligning Arch Length With Shoe Flex Points
Beyond heel-to-toe measurements, arch length determines whether your backpacking shoes will flex naturally with your foot’s biomechanics. Measure from your heel to the metatarsal head-this distance must align with your shoe’s designed flex point. Poor arch alignment creates heel lift, blisters, and plantar fasciitis risk.
Your shoe flex should occur exactly where your foot bends at the ball. Test this by flexing the shoe while wearing it-the bend point should match your natural foot mechanics. If your arch length exceeds heel-to-toe measurement, size primarily by arch length rather than overall foot length.
Check alignment by walking 15-20 minutes in the shoes. Observe heel slip and hot spots. Premature heel wear indicates misalignment.
Properly aligned shoes reduce fatigue and prevent injury during extended backpacking trips.
Optimal Timing and Conditions for Boot Fitting
Proper arch alignment sets the foundation, but timing your boot fitting session dramatically impacts whether you’ll achieve an accurate fit. Your feet naturally swell 5-10% throughout the day, reaching maximum size by late afternoon or evening. This timing replicates actual trail conditions better than morning fitting sessions.
Optimal fitting conditions require three key elements:
- Temperature Control – Fit boots at hiking temperatures since material flexibility changes with heat or cold.
- Surface Testing – Walk on inclined surfaces and stairs to assess toe room and heel hold.
- Proper Sock Selection – Wear identical hiking socks you’ll use on trails, including any liner combinations.
Boot fitting accuracy depends on replicating real hiking environments. Specialty stores with ramps simulate trail conditions effectively.
Always bring your intended insoles or orthotics for thorough fitting conditions assessment. Just as with hiking pants that feature moisture-wicking technology for comfort during extended hikes, proper footwear fitting ensures your gear performs optimally throughout your backpacking adventure.
Utilizing Lacing Systems and Volume Adjustments
After achieving ideal boot timing and conditions, mastering your lacing system transforms an adequate fit into a precision tool for trail performance. Strategic lacing techniques provide targeted volume control across specific foot zones.
Start with criss-cross lacing as your baseline method. This distributes tension evenly across well-fitting boots. When you need ankle stability, apply the surgeon’s knot just below your ankle bone. Wrap laces twice before pulling tight to lock tension and prevent heel slippage.
Window lacing eliminates pressure points by skipping problematic eyelets. This creates relief zones over sensitive areas while maintaining overall boot security. Use lace hooks for independent ankle tension control, while D-rings provide intermediate locking points.
The 2-1-3 sequence around your ankle prevents lace bite. Double helix reduces friction during adjustments, while locked double helix prevents unwanted loosening during extended hiking sessions. Just as moisture management is crucial for hiking pants in hot weather, proper lacing also requires testing your boots with regular hiking socks to ensure accurate sizing and prevent hot spots during long-distance treks.
Preventing Hot Spots and Friction Through Proper Fit
Even perfect lacing won’t save you from blisters if your boots don’t fit properly in the first place. Proper fit prevents hot spots through three critical factors that directly impact foot fatigue and blister prevention.
Your toe box requires sufficient room for natural foot expansion during extended hiking. Size up ½ to 1 full size from street shoes to accommodate swelling at altitude. Cramped toes create pressure points leading to blackened nails and painful blisters on descents.
Moisture management through proper sock selection reduces friction considerably:
- Choose synthetic or wool hiking socks over cotton for superior moisture-wicking.
- Change socks mid-hike during long treks to maintain dryness.
- Verify adequate breathability in your footwear to prevent sweat accumulation.
Control heel slip through snug ankle lacing and proper internal volume. Excessive movement creates friction zones that develop into painful hot spots. Look for hiking boots with removable insoles that allow you to customize the fit with orthotics or specialized inserts for additional comfort and blister prevention. Consider footwear with memory foam construction to provide superior cushioning and arch support that adapts to your foot shape during long hiking sessions.
Frequently Asked Questions
How Often Should I Replace My Backpacking Boots Due to Wear?
You should replace your backpacking boots every 500-1,000 miles or when wear indicators like sole cracks, midsole compression, or upper tears appear, affecting your boot lifespan and hiking performance.
Can I Use the Same Boots for Different Terrains and Seasons?
You can use the same boots for different terrains and seasons if they offer multi terrain versatility and seasonal adaptability. Look for waterproof membranes, aggressive outsoles, and balanced support for ideal performance.
Should I Break in New Boots Before My First Backpacking Trip?
Yes, you should absolutely break in new boots before backpacking. Proper boot fitting and break in techniques require 2-3 weeks minimum to prevent blisters and injuries on your trip.
On a final note
You’ve now mastered the essential components of proper backpacking shoe fit. Your feet will thank you when you’re twenty miles into a multi-day trek. Remember that perfect fit isn’t negotiable-it’s the foundation of every successful hiking experience. Take time during your fitting process, don’t rush your decisions, and always prioritize function over aesthetics. Well-fitted boots transform challenging terrain into manageable miles, while poor fit guarantees misery on the trail.